HOME RENOVATION COST BREAKDOWN AT A GLANCE
| Category | % of Budget | What It Includes | Pro Tips |
| Labor & Installation | 30-35% | Contractor fees, subcontractor work, project management | Get 3+ quotes, verify licenses, check references |
| Materials & Supplies | 35-40% | Flooring, tile, fixtures, appliances, lumber, hardware | Buy during sales, consider alternatives to premium brands |
| Permits & Inspections | 2-5% | Building permits, inspection fees, plan review costs | Budget $500-$2,500 depending on project scope |
| Design & Planning | 5-10% | Architect fees, designer costs, engineering calculations | DIY simple projects, hire pros for complex changes |
| Contingency Fund | 15-20% | Unexpected discoveries, change orders, price increases | NEVER skip this—hidden problems are guaranteed |
| Soft Costs | 5-8% | Temporary housing, storage, utilities, dumpsters, cleaning | Often forgotten, adds up quickly |
Critical Rule: If contractors quote significantly below these percentages, they’re either cutting corners or don’t understand full scope.
Understanding the True Cost of Home Renovations
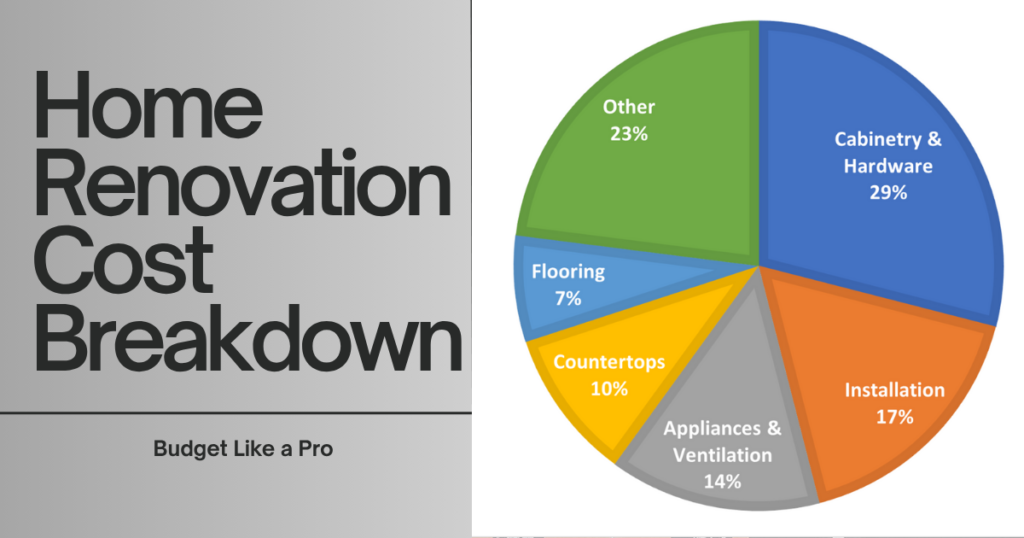
A home renovation cost breakdown divides your total budget into six essential categories: labor and installation (30-35%), materials and supplies (35-40%), permits and inspections (2-5%), design and planning fees (5-10%), contingency fund for surprises (15-20%), and soft costs like storage and utilities (5-8%). Understanding this breakdown helps you budget like a pro by allocating funds proportionally across all necessary expenses, preventing the common mistake of overallocating to materials while underbudgeting for labor or unexpected issues. Professional contractors use these percentages to create accurate estimates that account for every expense from demolition to final walkthrough.
Renovation costs extend far beyond the obvious expenses like cabinets and countertops. A true cost breakdown captures every dollar you’ll spend, from the first contractor consultation to the final cleaning after construction completes. Misunderstanding this comprehensive picture is why most homeowners underestimate their actual costs by 30% or more.
The biggest misconception about renovation budgeting is believing that materials represent your largest expense. While materials do consume a significant portion—typically 35-40% of your budget—labor costs rival or exceed this amount. Professional installation, skilled trade work, and project management services account for another 30-35%. Together, these two categories alone consume 65-75% of your total budget, leaving just 25-35% for everything else.
What catches most homeowners off guard are the “hidden” cost categories that don’t appear in contractor quotes. Permits and inspections seem like minor paperwork but can cost $500 to $5,000 depending on your project’s scope and location. Design services from architects or interior designers add 5-10% to your budget but prevent costly mistakes that would cost more to fix later. Soft costs like temporary housing during major renovations, storage unit rental for furniture, utility increases during construction, and professional cleaning afterward add another 5-8%.
Then there’s the category no one wants to discuss but everyone needs: the contingency fund. This 15-20% buffer isn’t pessimism—it’s reality. Every renovation uncovers unexpected problems. Water damage hidden behind walls. Electrical systems that don’t meet current code. Structural issues requiring engineer involvement. Without adequate contingency funding, these discoveries force you to cut corners elsewhere or go into debt to complete your project properly. For comprehensive renovation planning that prevents these surprises, start with our complete home renovation guide.
Understanding these percentages before you start prevents the classic mistake of allocating 80% of your budget to materials and fixtures, then discovering you have insufficient funds for professional installation or can’t afford permits. Professional-quality renovations require balanced allocation across all expense categories, not just the glamorous parts that appear in after photos.
Labor and Installation Costs: Your Largest Investment
Labor typically represents your single largest or second-largest expense category, consuming 30-35% of your total renovation budget. This category encompasses every person who works on your project, from your general contractor’s project management to specialized subcontractors handling electrical, plumbing, HVAC, and finish work.
Understanding what drives labor costs helps you budget accurately and identify quotes that seem suspiciously low. Geographic location dramatically impacts labor rates—contractors in major metro areas charge 30-50% more than those in rural communities. Project complexity affects costs too. Straightforward work like installing pre-hung doors costs less per hour than custom tile work requiring precise pattern matching. Union vs. non-union labor creates significant price differences in areas where unions are prevalent.
General contractor fees typically add 15-25% above the actual subcontractor costs as project management fees. Some homeowners view this markup as unnecessary, but general contractors coordinate multiple trades, manage schedules, handle permits, order materials, and solve problems—services that prevent costly mistakes and delays. Attempting to be your own general contractor to save money often backfires when you lack the experience to coordinate trades efficiently or don’t know how to handle unexpected issues.
Breaking down typical labor costs by trade provides realistic expectations. Demolition labor runs $2-7 per square foot depending on what’s being removed. Rough carpentry and framing costs $3-10 per square foot. Electrical work charges $50-100 per hour plus materials, with whole-house rewiring costing $3-10 per square foot. Plumbing labor runs similar rates at $45-150 per hour. Drywall installation and finishing costs $1.50-3.50 per square foot. Professional painting charges $2-6 per square foot including labor and paint. Flooring installation varies by material—hardwood installation adds $3-8 per square foot, tile installation $5-15 per square foot.
Smart homeowners reduce labor costs without sacrificing quality by handling appropriate DIY tasks. Demolition, painting, and simple installations like light fixtures or cabinet hardware are within most people’s capabilities. However, anything involving structural modifications, electrical work, plumbing, gas lines, or critical waterproofing should be left to licensed professionals. The money you save doing unsafe DIY work disappears quickly when you must hire professionals to fix your mistakes—often at premium rates because they’re correcting problems rather than starting fresh.
When evaluating contractor bids, don’t simply choose the lowest price. Extremely low bids often indicate contractors who underestimate hours required, plan to use unskilled labor, or will cut corners on critical details. The middle-range bids from reputable contractors with proper licensing, insurance, and strong references typically provide the best value. Our guide on hiring and working with contractors provides detailed vetting strategies.
Materials and Supplies: Balancing Quality and Cost
Materials and supplies consume 35-40% of your renovation budget, representing everything from structural lumber to the decorative hardware on your cabinets. This category offers the most flexibility for budget adjustments because material choices span vast price ranges—a kitchen faucet can cost $50 or $5,000, and both install the same way.
Understanding material price tiers helps you make informed decisions. Budget-tier materials offer basic functionality at the lowest prices. Think laminate countertops, stock cabinets from big-box stores, vinyl flooring, and builder-grade fixtures. These products work adequately but typically have shorter lifespans, fewer finish options, and less sophisticated designs. Mid-range materials provide better durability, more finish options, and improved aesthetics at moderate prices. Examples include quartz countertops, semi-custom cabinetry, luxury vinyl plank flooring, and branded fixtures. Premium materials offer superior quality, extensive customization, longer warranties, and high-end aesthetics at the highest prices—think natural stone countertops, custom cabinetry, hardwood flooring, and designer fixtures.
The smart approach isn’t always choosing one tier exclusively. Instead, allocate your materials budget strategically. Splurge on high-use, high-impact items that affect both function and aesthetics daily. Kitchen countertops, bathroom vanity tops, and main flooring areas justify premium materials because you interact with them constantly and they determine your space’s overall impression. Save on items with minimal visual impact or that you interact with rarely. The inside of pantry cabinets, utility room flooring, or basic door hinges can be budget-tier without compromising your renovation’s success.
Material procurement timing significantly impacts costs. Buying during seasonal sales and clearance events saves 20-40% on identical products. Shopping at supplier warehouses rather than showrooms reduces markup. Buying multiple items from the same vendor often triggers volume discounts. Considering alternative brands or slightly different specifications can slash costs—that tile you love might be available in a discontinued color at half price, and the color difference might be imperceptible once installed.
Avoid common material budgeting mistakes that increase costs unnecessarily. Ordering insufficient materials forces expensive rush deliveries to complete work or creates visible variation when you must match discontinued products. Ordering excessive materials wastes money on products you can’t return. Ignoring lead times for custom or special-order materials delays your project while contractors sit idle. Choosing materials without understanding installation requirements can create surprises—that beautiful tile might require expensive specialty installation that doubles the actual cost per square foot.
Calculate material quantities accurately by measuring thoroughly, adding 10% waste factor for most materials, consulting with installers about their specific requirements, and verifying all measurements before ordering. Many suppliers offer free material calculation services if you provide accurate dimensions. Taking advantage of these services prevents costly ordering mistakes. For detailed guidance on selecting materials for specific rooms, see our articles on kitchen renovation and bathroom remodeling.
Design, Planning, and Professional Fees
Design and planning fees represent 5-10% of renovation budgets but deliver value far exceeding their cost. Professional designers and architects prevent expensive mistakes, maximize space efficiency, identify structural issues early, and create cohesive aesthetics that increase home value. Skipping professional design services to save money frequently costs more when poor planning requires mid-project corrections.
Architectural fees apply to projects involving structural changes, additions, or major space reconfigurations. Architects charge hourly rates ($100-250 per hour), percentage of construction costs (typically 8-15%), or flat fees for specific projects. Their services include space planning, structural engineering, creating construction drawings for permits, and coordinating with building officials. You need an architect when removing or modifying load-bearing walls, adding square footage, making significant layout changes, or pursuing major renovations requiring complex permits.
Interior designers focus on aesthetics, material selections, furniture placement, and decorative elements. Their fees are structured as hourly rates ($50-200 per hour), flat fees per room or project, or percentage of furniture and materials purchased (typically 15-30% markup). Designers excel at creating cohesive design schemes, sourcing materials and fixtures efficiently, preventing costly material mistakes, and managing installation of decorative elements. You benefit most from designers when you lack clear design vision, struggle with spatial planning, need help coordinating finishes and fixtures, or want access to trade-only products and pricing.
Some firms offer design-build services combining architectural design and construction management under one contract. This integrated approach streamlines communication, reduces coordination problems, and often saves money through efficiency gains. However, you sacrifice the checks and balances that come from separate design and construction contracts. Evaluate design-build firms carefully to ensure they have strong capabilities in both disciplines.
Reduce design fees without sacrificing quality by clearly defining your project scope before engaging professionals—you’ll pay for fewer design hours if you start with focused goals. Prepare detailed lists of must-haves, nice-to-haves, and deal-breakers so designers can work efficiently. Provide quick, decisive feedback on concepts and drawings rather than extensive revision cycles. Consider DIY options for simple cosmetic updates that don’t require structural expertise.
Even if you skip professional design services, allocate budget for at least one design consultation. A few hours with an experienced professional early in planning can identify potential problems, suggest efficient solutions, and provide material recommendations that save thousands in execution. Think of design fees as insurance against expensive mistakes—the cost of correcting poor planning far exceeds the cost of proper planning upfront. Our renovation planning timeline guide explains when to bring designers into your project.
The Contingency Fund: Your Financial Safety Net
The contingency fund is renovation budgeting’s most critical yet most commonly skipped category. This 15-20% buffer protects you from the inevitable unexpected discoveries, necessary changes, and market fluctuations that affect every renovation. Skipping contingency funding doesn’t prevent problems—it just forces you to handle problems through debt, credit cards, or leaving work incomplete.
Understanding why contingency funding is non-negotiable starts with recognizing renovation reality. Walls hide problems that become visible only after demolition. Electrical and plumbing systems reveal code violations once inspectors examine them. Structural issues emerge when you start making changes. Material prices fluctuate—what you budgeted at $5,000 might cost $6,500 by the time you’re ready to purchase. These aren’t worst-case scenarios; they’re normal renovation experiences.
Common unexpected costs include foundation or structural repairs when bearing walls show inadequate support, full electrical panel upgrades when your 100-amp service can’t handle new appliance loads, extensive mold or water damage remediation discovered behind old finishes, plumbing system repairs when old pipes fail during renovation, HVAC modifications needed when you change room layouts, asbestos or lead paint abatement in older homes, site access challenges requiring special equipment, and material price increases between planning and purchasing.
Calculate your contingency fund realistically based on project age and complexity. Newer homes (less than 20 years old) with straightforward updates need 10-15% contingency. Homes 20-50 years old with moderate renovations require 15-20% contingency. Historic homes (50+ years) or major renovations involving structural changes need 20-25% contingency. Gut renovations down to studs demand 25-30% contingency because you’re likely to encounter every possible surprise.
Managing your contingency fund strategically maximizes its protective value. Keep contingency separate from main budget categories—don’t mentally allocate it to “nice-to-haves” before problems arise. Track contingency spending separately to understand how much protection remains. Authorize contingency spending only for genuine unexpected needs, not upgrades you decided you want mid-project. When problems arise, get multiple quotes for solutions before authorizing work. Consider cost-effective alternatives that solve problems without depleting contingency completely.
If you’re fortunate enough to complete your renovation without touching contingency funds, you have several smart options. Apply it to those “nice-to-have” upgrades you originally postponed, create an emergency fund for future home maintenance, or simply keep it in savings for the next home project. Viewing unused contingency as wasted money is backwards thinking—it’s successful planning that prevented financial stress. For strategies on managing renovation challenges and unexpected costs, read our article on handling renovation problems.
Permits, Inspections, and Soft Costs
Permits and inspections typically consume 2-5% of renovation budgets, while soft costs add another 5-8%. Together, these often-overlooked categories can account for 7-13% of your total budget—a significant amount that catches unprepared homeowners off guard.
Building permits aren’t optional extras contractors suggest to increase costs. They’re legal requirements for most renovations involving structural changes, electrical work, plumbing modifications, mechanical system updates, or additions to your home’s footprint. Permit costs vary dramatically by location and project scope. Simple bathroom updates might require just a $100-300 permit. Extensive kitchen renovations with plumbing and electrical modifications cost $500-2,000 in permits. Whole-home renovations or additions can exceed $5,000 in combined permit fees.
Beyond base permit fees, expect additional costs for plan review charges (typically 25-50% of permit fees), multiple inspection fees throughout construction ($50-200 per inspection), re-inspection fees if initial inspections fail ($50-150 per re-inspection), and engineering stamps on structural plans ($500-2,000 depending on complexity). These costs add up quickly, especially for complex projects requiring multiple inspection visits and professional engineering documentation.
Skipping permits to save money creates expensive problems. Building departments can issue stop-work orders halting your project until you obtain proper permits, plus fines of $500-10,000. Future home sales become complicated when unpermitted work appears on home inspections—buyers may demand corrections, request price reductions, or walk away entirely. Insurance companies can deny claims related to unpermitted work, leaving you financially liable. Correcting unpermitted work often costs more than doing it right initially because you must open up completed work for inspection or completely redo it.
Soft costs represent another frequently underestimated category. These indirect expenses don’t appear in contractor quotes but significantly impact your actual renovation costs. Common soft costs include temporary housing during major renovations ($1,000-5,000 per month depending on local rental markets), storage unit rental for furniture and belongings ($75-300 per month), construction dumpster rental ($300-800 per container), increased utility costs during construction ($100-400 monthly increase), professional cleaning after construction completion ($200-1,000 depending on home size), temporary fence rental if required by local ordinances ($150-400 per month), security measures to protect open construction sites, and costs associated with maintaining two residences if you can’t occupy your home during renovation.
Property taxes may increase mid-renovation if your county conducts assessments during construction, affecting your ongoing costs. HOA fees continue throughout renovation even if you’re not living there. Mortgage payments don’t stop during construction regardless of occupancy. Factor all these ongoing costs into your renovation budget, especially for projects lasting several months.
Smart homeowners minimize soft costs through strategic planning. Schedule renovations to allow continued occupancy in portions of your home, reducing or eliminating temporary housing costs. Coordinate with contractors to remove construction debris regularly, potentially avoiding multiple dumpster rentals. Plan renovations during moderate weather to minimize climate control costs. Complete messy demolition work quickly to reduce extended storage needs. Despite best efforts, some soft costs are unavoidable—budget for them rather than being blindsided.
Room-by-Room Budget Allocation Guidelines
Different rooms require vastly different budget allocations based on their complexity, size, and the quality of materials and finishes involved. Understanding typical cost distributions helps you plan realistic budgets for your specific project scope.
Kitchen renovations consume the largest budgets, typically $25,000-75,000 for full remodels. Budget breakdown for kitchens includes cabinetry (30-40% of room budget), countertops (10-15%), appliances (15-20%), flooring (5-10%), plumbing fixtures and installation (5-10%), lighting (5-8%), backsplash (3-5%), and labor/installation (30-35%). The wide price range reflects vast material choices—stock cabinets cost $100-300 per linear foot while custom cabinetry runs $500-1,200 per linear foot. Similarly, laminate countertops cost $20-50 per square foot installed, while premium granite or quartzite costs $75-200 per square foot.
Bathroom renovations range from $10,000-35,000 for full remodels of average-sized bathrooms. Budget allocation includes vanity and countertop (15-25%), shower or tub (15-25%), toilet (5-10%), flooring (10-15%), tile work including shower surround (15-20%), plumbing fixtures and installation (10-15%), lighting and mirrors (5-10%), and labor/installation (30-35%). Luxury primary bathrooms with premium finishes, freestanding tubs, large tile showers, and high-end fixtures easily exceed $50,000.
Master bedroom additions or expansions typically cost $50,000-150,000 including construction, finishes, HVAC extension, electrical, and window installation. Budget allocation includes framing and structural work (20-25%), windows and doors (10-15%), HVAC extension (8-12%), electrical (8-12%), insulation and drywall (15-20%), flooring (10-15%), painting and trim (8-12%), and permits/inspections (3-5%). Additions are among the most expensive renovation types per square foot because you’re building from the ground up rather than working within existing structures.
Living space updates including living rooms, dining rooms, and family rooms cost $5,000-25,000 depending on scope. These typically cosmetic renovations allocate budget to flooring (30-40%), painting (15-25%), trim and molding (10-15%), lighting updates (10-15%), built-ins or shelving (10-20%), and labor (25-30%). These rooms often offer the best opportunities for value-conscious homeowners to make high-impact changes on moderate budgets because they rarely require expensive plumbing or major electrical work.
Basement finishing projects run $30,000-75,000 for average-sized basements. Unique challenges like moisture management and egress requirements affect budget allocation: moisture prevention and drainage (10-15%), framing and drywall (20-25%), flooring (15-20%), electrical and lighting (10-15%), HVAC extension (8-12%), bathroom addition if included (20-30%), stairs and egress windows (10-15%), and permits/inspections (3-5%). Basement renovations deliver excellent return on investment because you’re converting previously unusable square footage into living space.
Use these guidelines as starting points but adjust based on your specific circumstances, material quality preferences, local labor costs, and project complexity. A kitchen renovation in rural Tennessee costs 30-40% less than an identical renovation in San Francisco. Your choices drive final costs more than these averages. For detailed information about specific room renovations, explore our guides on kitchen remodeling, bathroom renovation, and flooring selection.
Strategic Budget Cuts That Don’t Sacrifice Quality
Every renovation faces moments when costs exceed budgets, forcing difficult decisions about where to cut expenses. Smart budget cuts preserve your renovation’s core functionality and aesthetics while eliminating unnecessary spending. Poor cuts compromise quality, leading to dissatisfaction and premature failures requiring expensive corrections.
Never cut these critical areas: structural work and foundation repairs because problems only worsen and become more expensive over time. Proper waterproofing in bathrooms and kitchens since water damage from shortcuts costs exponentially more to repair. Licensed electrician work for safety and code compliance. Professional plumbing installation to prevent leaks, water damage, and code violations. Quality framing and structural support as compromises create unsafe conditions. Adequate ventilation particularly in bathrooms and kitchens to prevent mold and moisture damage. Permits and inspections because skipping these creates legal and financial nightmares.
Safe areas to reduce spending include finishing materials where good mid-range options perform nearly as well as premium options—luxury vinyl plank flooring instead of hardwood, quartz instead of marble countertops, good-quality stock cabinets instead of custom. Hardware and decorative fixtures where you can install builder-grade now and upgrade later when budget allows. Appliance choices by selecting mid-range brands rather than luxury models or choosing floor models and last year’s models at significant discounts. Certain aesthetic elements like ornate crown molding, decorative backsplashes, or accent walls that you can add in future phases. Project scope by eliminating non-essential areas—renovate the master bathroom now, guest bathroom next year.
Smart substitution strategies maximize budget impact without compromising results. Subway tile creates classic looks at fraction of decorative tile costs. Open shelving substitutes for upper cabinets in portions of kitchens, reducing cabinet costs while creating modern aesthetics. Paint-grade cabinets cost significantly less than stained wood but look beautiful in many design styles. Laminate or vinyl plank flooring mimics hardwood appearance at 50-70% cost savings. Standard-size windows and doors avoid custom premiums while offering excellent quality and energy efficiency. DIY painting, demolition, and simple installation tasks reduce labor costs without compromising critical work quality.
Phased renovation approaches spread costs across time, making larger projects affordable. Complete high-priority areas first, living with existing conditions in lower-priority spaces until budgets rebuild. Focus initial work on spaces most critical to daily life—kitchen and primary bathroom before guest bedroom. Complete all structural, mechanical, and permit-required work in phase one to avoid duplicating permit and coordination costs. Leave cosmetic finishes for later phases when you can save cash rather than financing these elements.
Scope reduction strategies create impactful results on tighter budgets by refocusing projects on essentials. A kitchen “refresh” replacing countertops, backsplash, hardware, and paint while keeping existing cabinets costs 50-70% less than full remodels. Tub-to-shower conversions cost significantly less than full bathroom gut renovations while dramatically improving functionality. Focusing on the most visible, most-used spaces delivers satisfaction even if less-visible areas wait for future phases.
Whatever cuts you make, maintain adequate contingency funding. Eliminating your buffer to afford better finishes guarantees financial stress when inevitable problems arise. Better to postpone certain upgrades and preserve contingency than commit your full budget to original plans with no safety net.
Tracking and Monitoring Your Renovation Budget
Creating an accurate budget is just the first step. Successful renovation budgeting requires disciplined tracking, regular monitoring, and prompt adjustments when costs diverge from plans. Most budget overruns occur not from poor initial budgets but from inadequate tracking that allows small overages to compound into massive problems.
Establish your tracking system before spending the first dollar. Choose a method matching your comfort level with technology and complexity. Simple spreadsheet budgets work well for straightforward renovations, listing all categories with columns for budgeted amounts, actual costs, variance, and notes. Project management apps like BuildBook, Houzz Pro, or Renovate+ provide specialized renovation budget tracking with receipt photo storage, contractor communication, and reporting features. Financial software like Quicken or YNAB allows renovation budget tracking within broader financial management. Whatever system you choose, use it consistently—sporadic tracking provides no protection against overruns.
Implement daily or weekly tracking discipline depending on project pace. During active construction, record expenses daily to catch problems immediately. During slower phases like permit approval, weekly tracking suffices. Include every expense regardless of size—those $47 hardware store trips add up to thousands over project duration. Categorize expenses immediately rather than leaving uncategorized purchases to sort later. Take photos of receipts and store them with digital records since paper receipts fade and get lost.
Schedule formal budget reviews weekly during construction. Compare actual costs to budgets across all categories, identify categories trending over budget, review upcoming expenses to ensure sufficient funds remain, adjust projections based on current trends, and communicate status with contractors and family members. These regular reviews prevent the shock of discovering you’re $15,000 over budget when the project is 80% complete. Early detection allows course corrections before problems become irreparable.
Identify and address overspending signals promptly. Warning signs include multiple categories exceeding budgets simultaneously, contingency fund depleting faster than project percentage complete, contractor requesting more frequent or larger payments than scheduled, material orders consistently exceeding estimates, change orders accumulating without corresponding budget adjustments, and project timeline extending significantly beyond original schedule. Any of these signals demands immediate attention and corrective action.
When tracking reveals overages, take immediate corrective steps. Stop all non-essential spending until you assess the situation completely. Identify overage causes—are estimates wrong, have scopes changed, are there material price increases, or is there poor cost control? Evaluate remaining work to forecast total overrun amount. Develop recovery strategies through scope reductions, material downgrades, or additional funding. Implement changes immediately rather than hoping costs somehow decrease.
Many homeowners make tracking mistakes that undermine their budgets. Common errors include failing to record cash purchases, forgetting to include tips and meals for workers, not tracking design and planning expenses, ignoring soft costs like storage and utilities, and counting contingency as available funds before problems arise. Avoid these by recording every expense immediately, including all renovation-related costs regardless of category, and maintaining strict separation between your main budget and contingency fund.
Digital receipt organization prevents documentation chaos. Take photos of all receipts immediately and store them in cloud-based folders organized by category. Many credit cards and apps automatically categorize purchases, simplifying tracking. Save email confirmations from online purchases in dedicated renovation folders. This documentation proves invaluable for warranty claims, insurance purposes, tax deductions if applicable, and resolving disputes with contractors.
Conclusion: Building Your Bulletproof Renovation Budget
Mastering your home renovation cost breakdown means understanding that budgets extend far beyond materials and contractor quotes. Successful renovations allocate 30-35% to labor, 35-40% to materials, 15-20% to contingency buffers, and the remaining funds across permits, design fees, and soft costs that catch unprepared homeowners off guard. Tracking every expense rigorously, making strategic cuts when necessary, and maintaining adequate contingency funding separates renovation success from financial disaster.
Your renovation budget isn’t just a financial document—it’s your project’s roadmap that guides every decision from initial planning through final completion. Start by calculating realistic total budgets based on similar project costs in your area. Allocate funds across all categories using the percentages in this guide, not just the exciting material selections. Track spending religiously from day one, and review your budget weekly during construction to catch problems early. Never eliminate contingency funding to afford better finishes—unexpected problems are guaranteed, not possible.
Ready to start budgeting your renovation like a pro? Begin with our complete home renovation guide for comprehensive planning strategies. Then explore our renovation timeline planning article to coordinate your budget with realistic schedules. For room-specific guidance, check out our kitchen renovation and bathroom remodeling guides that provide detailed cost expectations and allocation strategies.
🏡 Explore More Home Improvement Guides
- Complete Flooring Guide: Every Type Explained for Your Home
- Complete Bathroom Renovation Guide: Style, Function & Budget Solutions
- Bathroom Renovation Masterclass: Your Complete Guide to a Successful Remodel
- Best Flooring for Every Room: Complete Guide with Expert Tips
- Kitchen Remodeling Guide: Everything You Need for a Successful Transformation
- Home Renovation Permits and Regulations: Complete Checklist
- Renovation Mistakes That Cost Thousands (And How to Avoid Them)
- Kitchen Layout Planning: Which Design Works for You?
- Best Kitchen Countertops: Comparing All Materials
- Smart Home Technology Integration Guide: Room-by-Room Blueprint
- Outdoor Living Spaces: Complete Design Guide for Year-Round Enjoyment
- Best Home Office Setup (2025 Guide): Accessories & Essentials for Productivity
- DIY vs Hiring Contractors: When to Call the Pros?
- Home Renovation Cost Breakdown: Budget Like a Pro
- How to Plan Your Home Renovation: Step-by-Step Timeline
- Complete Home Renovation Guide: Transform Your House Into Your Dream Home

