Introduction
Picture this: you’re standing in your outdated kitchen, frustrated by cramped counters, insufficient storage, and appliances that barely work. You’re not alone—kitchen remodels rank as the most popular home renovation project, with homeowners investing an average of $26,934 to transform their cooking spaces. But here’s the catch: without proper planning, that investment can quickly spiral into a financial nightmare marked by delays, cost overruns, and disappointing results.
The difference between a successful kitchen transformation and a renovation disaster comes down to preparation and knowledge. Whether you’re dreaming of a complete overhaul or strategic updates, understanding the remodeling process from start to finish gives you the confidence to make smart decisions and avoid costly mistakes. This comprehensive kitchen remodeling guide takes you through every critical step, from initial planning to the final installation, ensuring your project stays on track and delivers the beautiful, functional kitchen you deserve.
A successful kitchen remodel follows a structured process: assess your current space and define goals, establish a realistic budget with 20% contingency funds, create a functional design that improves workflow, select quality materials that balance aesthetics with durability, hire licensed contractors with proven track records, obtain necessary permits before construction begins, and manage the project through demolition, rough-in work, installations, and finishing touches. The entire process typically takes 6-12 weeks for execution, plus 2-8 weeks for planning and material selection.
Kitchen Remodel Quick Facts
| Aspect | Details | Key Considerations |
| Average Cost | $26,934 (range: $14,600-$41,485) | Major kitchen: $40,000-$70,000+ |
| Timeline | 6-12 weeks construction | Add 2-8 weeks for planning/ordering |
| ROI (Major Remodel) | 55-59% | Small updates: 81%+ ROI |
| ROI (Minor Remodel) | 70-85% | Best for near-term home sales |
| Budget Breakdown | Cabinets: 30-40%, Countertops: 10-15%, Appliances: 15-20%, Labor: 20-35% | Save 20% for contingencies |
| Most Expensive Items | Custom cabinets, stone countertops, high-end appliances | Can comprise 60% of budget |
| Permits Required | Structural, electrical, plumbing, gas work | Check local requirements early |
| Peak Season | Spring-Summer | Fall-Winter may offer better contractor availability |
Assessing Your Current Kitchen and Defining Goals
Before you start browsing Pinterest boards or visiting showrooms, take time to thoroughly evaluate your existing kitchen. This critical first step in your kitchen remodeling guide determines what you’ll keep, change, or eliminate entirely—decisions that significantly impact your budget and timeline.
Walk through your kitchen during different times of day and document everything that works well and everything that frustrates you. Notice how morning sunlight streams through that east-facing window but the inadequate overhead lighting makes evening cooking difficult. Observe how the refrigerator door blocks the walkway when opened, or how you constantly zigzag between the sink, stove, and prep area during meal preparation.
Creating your comprehensive needs assessment:
Start by making two lists: “What Works” and “What Doesn’t Work.” Be specific. Don’t just write “not enough storage”—note exactly what you can’t store properly. Maybe your pot collection doesn’t fit in lower cabinets, or you lack counter space for your stand mixer and food processor. Perhaps your family of five has outgrown a kitchen designed for two, or you’re an empty-nester who no longer needs space for multiple cooks working simultaneously.
Consider these critical evaluation areas: Storage capacity and organization, counter space and work surfaces, appliance functionality and efficiency, lighting quality throughout the day, flooring condition and maintenance requirements, traffic flow and workspace layout, dining or gathering space, and electrical outlets and placement.
Defining clear remodeling objectives:
Once you understand your kitchen’s shortcomings, translate them into specific goals. Your objectives might include maximizing storage with floor-to-ceiling cabinets and a walk-in pantry, improving workflow by creating a proper work triangle, updating to energy-efficient appliances that reduce utility bills, creating an open layout that connects to adjacent living spaces, adding an island for additional prep space and casual seating, or incorporating smart storage solutions like pull-out organizers and corner carousel units.
Understanding how you actually use your kitchen:
Be honest about your cooking habits and lifestyle. Do you prepare elaborate meals from scratch three times daily, or do you primarily reheat takeout and make coffee? Are you an avid baker who needs specialized storage for baking sheets and mixers? Do you entertain frequently, requiring space for guests to gather while you cook? Does your family treat the kitchen as homework central and activity hub?
Your daily kitchen activities should drive design decisions. A serious home chef needs professional-grade appliances, ample prep space, and specialized storage for extensive cookware collections. A busy family prioritizes durability, easy-clean surfaces, and organizational systems that keep school papers and snacks accessible but tidy. Empty-nesters might want to downsize appliances and storage while creating a gourmet coffee station or wine bar.
Setting priorities for your must-haves versus nice-to-haves:
Kitchen remodeling projects always involve trade-offs between desires and budgets. Create a prioritized wish list that separates essential changes from aspirational upgrades. Your “must-haves” might include replacing a failing dishwasher, adding a vent hood that actually removes cooking odors, or fixing that perpetually broken drawer. Your “nice-to-haves” might include heated flooring, a pot-filler faucet, or that gorgeous hand-painted backsplash tile.
This prioritization becomes crucial when unexpected costs arise or bids come in higher than anticipated. Knowing what you absolutely need versus what you simply want allows you to make informed decisions about where to cut back without sacrificing functionality.
Establishing Your Kitchen Remodel Budget
Money matters drive every remodeling decision, making budget planning arguably the most important section of this kitchen remodeling guide. Get this wrong, and you’ll either compromise on essential elements or find yourself halfway through construction without funds to complete the project.
Understanding realistic kitchen remodel costs:
Kitchen renovations vary dramatically in price based on size, scope, material quality, and location. According to recent data, homeowners spend anywhere from $14,600 for minor updates to $41,485 for major overhauls, with the national average around $26,934. However, in high-cost areas or for luxury renovations, budgets can easily exceed $70,000 to $100,000.
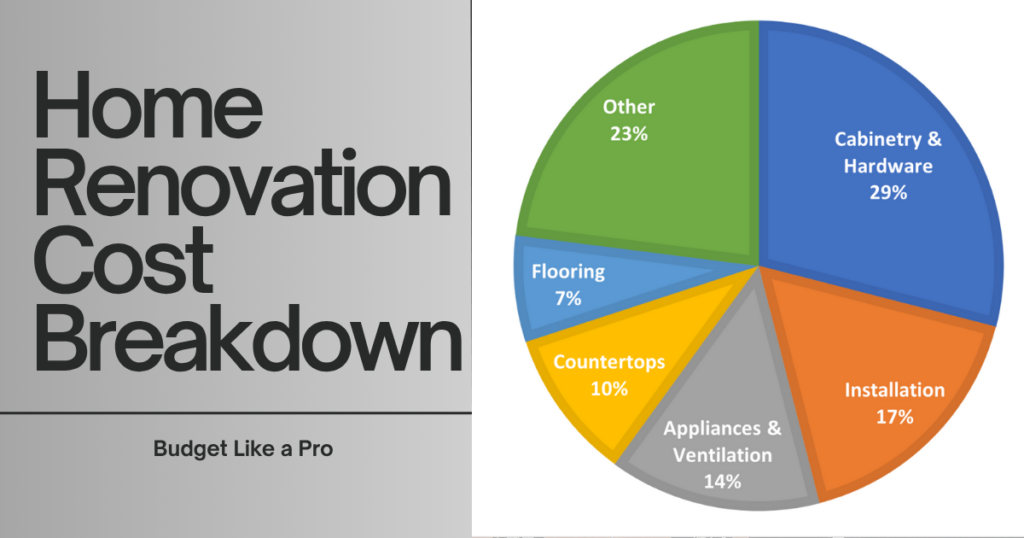
Breaking down where your money goes helps you allocate funds appropriately. Cabinets typically consume 30-40% of your budget as the most expensive single element. Countertops and backsplashes take another 10-15%. Appliances account for 15-20%, while labor costs represent 20-35% depending on your market and project complexity. Flooring, lighting, plumbing fixtures, and hardware divide the remainder.
The non-negotiable 20% contingency fund:
Every experienced contractor will tell you the same thing: set aside 20% of your total budget for unexpected costs. Not 10%, not 15%—20%. This buffer isn’t pessimism; it’s realism. Hidden water damage behind walls, outdated wiring that doesn’t meet current codes, plumbing that needs rerouting, or material price increases during your project all require additional funds.
Consider this real scenario: You budget $30,000 for your remodel. During demolition, contractors discover mold behind the sink wall requiring $3,000 in remediation. Your electrical panel can’t handle new appliances, necessitating a $2,000 upgrade. Tile you selected gets discontinued, forcing you to choose a $1,200 more expensive alternative. Without that $6,000 contingency fund, you’re scrambling for emergency financing or making painful compromises.
Creating your detailed budget breakdown:
Start by researching costs for your specific market. Visit local showrooms to understand appliance, cabinet, and countertop pricing. Get quotes from several contractors for labor costs. Factor in often-forgotten expenses like permits ($300-$2,000), design fees if hiring a kitchen designer ($1,000-$5,000), temporary kitchen setup, meals out during construction, dumpster rental, and final cleaning services.
Build your budget in spreadsheet format with columns for estimated costs, actual costs, and variance. This tracking system alerts you early when spending threatens to exceed projections, allowing course corrections before problems compound.
Where to splurge and where to save:
Not all kitchen elements deserve equal investment. Prioritize quality in high-use, high-impact areas while economizing elsewhere. Invest in durable cabinet boxes with quality hardware—they’ll last decades. Choose solid surface or quartz countertops that withstand daily use without constant maintenance. Select reliable, energy-efficient appliances from reputable manufacturers.
Save money on cabinet doors and drawer fronts, which can be updated later if styles change. Choose good-quality but not premium faucets and fixtures. Consider laminate or luxury vinyl flooring instead of hardwood if you’re budget-conscious—modern products look remarkably authentic. Use tile only where it’s most visible, such as the backsplash focal point behind the range, while using less expensive alternatives elsewhere.
Financing your kitchen remodel:
Few homeowners pay cash for major renovations. Common financing options include home equity loans offering fixed rates and predictable payments, home equity lines of credit providing flexibility to draw funds as needed, cash-out refinancing if current rates are favorable, personal loans for smaller projects, or contractor financing programs. Compare interest rates, terms, and fees carefully before committing to any financing option.
Remember to factor financing costs into your budget. A $40,000 remodel financed at 7% over five years actually costs $47,500 including interest. Understanding true project cost including financing helps you make informed decisions about project scope.
Designing Your Dream Kitchen Layout
Layout determines whether your kitchen functions beautifully or frustrates you daily. Poor layout design creates inefficient work patterns, wasted steps, and congestion. Smart layout planning delivers seamless workflow, adequate workspace, and comfortable traffic patterns that make cooking genuinely enjoyable.
Understanding the kitchen work triangle:
The work triangle concept—positioning your sink, stove, and refrigerator in triangular configuration—has guided kitchen design for decades. The ideal triangle features legs measuring 4-9 feet each, with the total perimeter between 13-26 feet. This arrangement minimizes walking distance between the three most-used work zones while preventing them from being so close that multiple cooks bump into each other.
However, modern kitchens often need more sophisticated approaches than the basic triangle. If you frequently have multiple cooks working simultaneously, consider creating work zones rather than a single triangle. Designate separate areas for food prep, cooking, baking, and cleanup, each with its own supplies and tools.
Popular kitchen layout configurations:
Galley Kitchens: Two parallel counters create an efficient corridor perfect for small spaces. Everything stays within a few steps, though traffic flow can become problematic if the galley serves as a hallway to other rooms. Galley layouts work beautifully for serious cooks who value efficiency over entertaining space.
L-Shaped Kitchens: Counters along two perpendicular walls create open floor space perfect for adding an island or kitchen table. This versatile layout works well for small to medium kitchens and naturally creates zones for different activities.
U-Shaped Kitchens: Three walls of cabinets and counters provide maximum storage and work surface. However, U-shapes can feel cramped in smaller rooms and may create a closed-off atmosphere that isolates the cook from family activities.
Island Kitchens: Adding an island to L-shaped or U-shaped layouts creates additional prep space, storage, and seating. Islands work best in kitchens with at least 150 square feet and require minimum 36-inch clearances on all sides for comfortable traffic flow—42-48 inches is ideal.
Peninsula Kitchens: Similar to islands but attached to existing cabinets or walls, peninsulas provide island benefits in smaller spaces while defining kitchen boundaries in open floor plans.
Choosing the right layout for your space:
Your existing kitchen’s footprint and your budget constraints often determine layout possibilities. Moving plumbing lines, gas connections, and major electrical work adds $3,000-$10,000 or more to your budget. If keeping the existing footprint saves significant money, focus on maximizing the current layout’s potential rather than relocating everything.
However, if your current layout fundamentally doesn’t work, investing in reconfiguration pays dividends in daily use satisfaction. Consider moving a peninsula to an island position if space allows, relocating the sink to an island for improved workflow and visibility into living areas, or removing a wall to create an open concept that connects kitchen to dining or family room.
Designing for optimal traffic flow:
Traffic patterns matter as much as work zones. Plan for 36-inch minimum clearances in walkways and 42-48 inches in work aisles where cabinet doors and drawers need to open. If your kitchen serves as a hallway to other rooms, position the work triangle away from the main traffic path so cooks aren’t constantly dodging passersby.
Consider how multiple people use the space simultaneously. If your family congregates in the kitchen during meal prep, create gathering spots away from active cooking zones. Position seating at an island or peninsula where helpers can assist or kids can do homework without interfering with cooking activities.
Incorporating your lifestyle into design:
Your kitchen design should reflect how you actually live. Avid bakers need dedicated zones with counter space for rolling dough, storage for baking sheets and mixers, and convenient access to flour, sugar, and other baking supplies. Coffee enthusiasts might want dedicated coffee stations with built-in espresso machines and mug storage. Wine collectors need proper wine storage with temperature control.
Families with young children benefit from lowered microwave placement, locked cabinets for cleaning supplies, and durable surfaces that withstand spills and dings. Empty-nesters might downsize appliances and storage while expanding entertaining features like wine fridges or beverage centers.
Selecting Materials, Finishes, and Appliances
Material selections dramatically impact your kitchen’s appearance, functionality, and longevity. This section of your kitchen remodeling guide explores how to choose finishes that balance beauty, durability, maintenance requirements, and budget constraints.
Cabinets: Your kitchen’s foundation:
Cabinets dominate your kitchen visually and financially. You’ll choose between stock cabinets (pre-manufactured in standard sizes, most affordable, limited customization), semi-custom cabinets (stock cabinets with modification options, moderate pricing, good selection), and custom cabinets (built specifically for your space, most expensive, unlimited options).
Cabinet construction quality matters more than you might think. Plywood boxes outlast particleboard, though quality particleboard with proper sealing works adequately for budget-conscious projects. Full-extension drawer glides, soft-close hinges, and solid wood or quality laminate doors justify their price premiums through decades of daily use.
Cabinet style dramatically affects your kitchen’s aesthetic. Shaker cabinets offer timeless appeal with simple, clean lines that work in traditional and contemporary settings. Flat-panel doors create sleek, modern looks. Raised-panel styles suit traditional or transitional designs. Glass-front cabinets showcase dishware while breaking up solid cabinet runs.
Color choices have evolved beyond all-white kitchens. Two-tone cabinets—perhaps navy lowers with white uppers, or natural wood lowers with painted uppers—add visual interest. Bold colors like deep green, charcoal gray, or rich navy create dramatic focal points, though neutrals offer broader appeal for future resale.
Countertop materials compared:
Countertop selection balances appearance, durability, maintenance, and cost. Quartz countertops ($50-$120 per square foot) offer the most practical choice for busy kitchens: non-porous, maintenance-free, consistent coloring, and excellent durability. Granite ($40-$100 per square foot) provides natural beauty with good durability but requires periodic sealing. Marble ($50-$150 per square foot) delivers unmatched elegance but scratches and stains easily, best reserved for baking zones or low-use areas.
Butcher block counters ($30-$60 per square foot) bring warmth and provide ideal prep surfaces but need regular oiling and refinishing. Laminate ($10-$40 per square foot) has improved dramatically in appearance and quality, offering budget-friendly options that mimic stone. Concrete ($65-$135 per square foot) creates custom, contemporary looks but requires professional installation and careful maintenance.
Backsplash options to complete your look:
Backsplashes protect walls from cooking splashes while adding design impact. Ceramic or porcelain tiles ($5-$30 per square foot installed) offer endless patterns, colors, and sizes at reasonable prices. Glass tiles ($25-$50 per square foot) reflect light beautifully and resist stains. Natural stone tiles match stone counters for cohesive looks. Large-format slabs eliminate grout lines for easy cleaning and dramatic visual impact.
Peel-and-stick tiles provide DIY-friendly, budget options for renters or temporary updates. Stainless steel creates commercial kitchen aesthetics while offering easy cleaning. Beadboard or shiplap adds cottage charm in farmhouse-style kitchens.
Flooring that stands up to kitchen demands:
Kitchen floors endure heavy traffic, dropped utensils, and frequent spills. Luxury vinyl plank ($3-$7 per square foot) tops many lists for kitchen flooring: waterproof, durable, affordable, and available in realistic wood and stone patterns. Porcelain or ceramic tile ($5-$15 per square foot) provides classic good looks with excellent durability, though grout requires maintenance and tile feels hard underfoot.
Hardwood flooring ($6-$20 per square foot) brings natural warmth but can be damaged by water and shows wear in high-traffic areas. Engineered hardwood offers better moisture resistance than solid wood. Cork ($5-$10 per square foot) provides comfortable, sustainable flooring with natural antimicrobial properties. Concrete ($2-$15 per square foot depending on finish) creates industrial-chic looks with excellent durability.
Appliance selection strategies:
Appliances represent significant investments that should last 10-15 years or more. Focus on reliability, energy efficiency, and features that match your cooking style rather than flashy functions you’ll never use. Reputable brands like Bosch, KitchenAid, GE, and Samsung generally deliver better long-term value than ultra-luxury brands or unknown budget manufacturers.
Choose appliance package deals when possible—matching refrigerator, range, dishwasher, and microwave from one manufacturer often saves 10-20% versus individual purchases. Decide early whether you want built-in, integrated, or freestanding appliances, as this choice affects cabinetry design and spacing.
Consider these appliance priorities: Refrigerators should match your storage needs without overwhelming the space, ranges or cooktops must provide adequate burners and BTU output for your cooking style, wall ovens add convenience if you bake frequently, dishwashers should operate quietly (look for models under 45 decibels), and microwave placement should be accessible but not dominate visual space.
Finding and Hiring the Right Contractor
Your contractor choice makes or breaks your kitchen remodel experience. This critical step in your kitchen remodeling guide determines whether your project finishes on time and on budget with quality workmanship, or becomes a nightmare of delays, cost overruns, and shoddy work.
Understanding different contractor types:
General contractors manage entire projects, coordinating all trades (electrical, plumbing, HVAC), ordering materials, scheduling inspections, and handling day-to-day problems. They typically charge 15-25% of total project cost. Kitchen specialists focus exclusively on kitchen remodels, often offering design services alongside construction. They may cost slightly more but bring specialized expertise. Design-build firms provide both design and construction services under one contract, streamlining communication and responsibility.
For smaller projects, you might hire individual tradespeople directly, acting as your own general contractor. This approach can save the GC markup but requires significant time investment and project management skills. Unless you have construction experience, hire a general contractor for projects involving multiple trades.
The comprehensive vetting process:
Start your contractor search by asking friends, family, and neighbors for recommendations. Personal referrals from people you trust provide valuable insights into contractor performance, communication style, and problem-solving abilities. Also check online reviews on Google, Yelp, and Houzz, looking for patterns in feedback rather than focusing on single extreme reviews.
Verify licenses and insurance before seriously considering any contractor. All legitimate contractors carry general liability insurance and workers’ compensation coverage. Request certificates of insurance and call insurance companies to confirm policies are current and adequate. Check that contractor licenses are active and in good standing with your state licensing board.
Request references from at least three recent clients with similar project scope. When calling references, ask specific questions: Did the contractor stay on budget? How did they handle unexpected problems? How was their communication throughout the project? Did they show up when promised? Was the work site kept reasonably clean? Would you hire them again? If possible, visit completed projects to evaluate workmanship quality firsthand.
Getting accurate, comparable bids:
Contact at least three contractors for detailed written estimates. Provide identical project scope descriptions to each, including your design plans, material selections, and any specific requirements. This ensures you’re comparing apples to apples rather than wildly different approaches.
Quality estimates include itemized costs for materials, labor, permits, cleanup, and overhead. Be wary of vague lump-sum bids without detailed breakdowns—they make it impossible to understand what you’re actually paying for or to spot missed items. Estimates should specify brand names and model numbers for appliances and fixtures, not just generic descriptions like “dishwasher” or “faucet.”
Evaluating beyond just price:
The lowest bid isn’t always the best choice. Contractors underbidding significantly often plan to profit through change orders for “unexpected” issues, use inferior materials, or hire unskilled labor. Extremely high bids might indicate contractors don’t actually want your job and are pricing to discourage you.
Assess overall value by considering contractor experience with similar projects, quality of previous work based on references and portfolios, professionalism in communication and presentations, timeline commitments and availability, warranty coverage offered, and your comfort level with their team.
Understanding contracts and protecting yourself:
Never start work without a comprehensive written contract. Your contract should include complete project scope detailing all work to be performed, itemized cost breakdown for materials and labor, payment schedule tied to completion milestones, project timeline with start and estimated completion dates, material specifications with brand names and models, permit responsibility and costs, cleanup and disposal procedures, warranty terms for labor and materials, and procedures for handling change orders.
Read every line before signing. If something’s unclear, ask for clarification or have an attorney review the contract. Never pay more than 10% upfront as a deposit. Structure subsequent payments around completion milestones: typically 30% after demolition and rough-in, 30% after drywall and major installations, 25% after substantial completion, and final 5% after passing final inspection and your satisfaction walkthrough.
Navigating Permits and Regulations
Obtaining proper permits protects your investment, ensures work meets safety codes, and prevents legal and financial problems during future home sales. This essential section of your kitchen remodeling guide clarifies permit requirements and processes.
What kitchen work requires permits:
Permit requirements vary by location, but most jurisdictions require permits for structural changes (removing or moving walls, changing ceiling heights), electrical work (new circuits, panel upgrades, major rewiring), plumbing modifications (moving sinks or appliances requiring water connections, adding gas lines), and mechanical systems (HVAC changes, vent hood installation).
Simple updates like painting, replacing cabinet doors, or swapping appliances in existing locations typically don’t require permits. When in doubt, contact your local building department—a quick phone call clarifies requirements and prevents expensive problems later.
The permit application process:
Start permit applications early—approval can take 2-6 weeks depending on project complexity and building department workload. Your contractor typically handles permit applications, but as the property owner, you’re ultimately responsible for ensuring proper permits exist.
Applications require detailed plans showing existing conditions and proposed changes, specifications for materials and products, contractor license information, and appropriate fees ($300-$2,000+ depending on project scope). More complex projects may need engineer-stamped drawings for structural modifications.
Managing inspections successfully:
Permitted work requires inspections at specific stages: rough-in inspections before walls are closed check electrical wiring, plumbing pipes, and HVAC ductwork, framing inspections verify structural modifications, and final inspections ensure completed work matches approved plans and meets all codes.
Schedule inspections 24-48 hours in advance and ensure work is truly ready—failing inspections delays your project and may trigger re-inspection fees. Post permits prominently at the job site where inspectors can easily see them. Keep inspection records carefully—you’ll need them for final sign-offs and future home sales.
Managing Your Kitchen Remodel Timeline
Understanding construction sequencing helps you set realistic expectations and identify when projects fall behind schedule. This kitchen remodeling guide section breaks down typical timelines and phases.
Pre-construction timeline (2-8 weeks):
Before demolition begins, expect 1-2 weeks for final design decisions and material selections, 2-4 weeks for ordering custom cabinets and special-order materials, 1-2 weeks for permit approval, and coordination time for contractor scheduling.
Don’t rush this phase. Taking extra time to finalize every decision prevents costly mid-project changes. Verify all orders before contractors start to avoid delays waiting for missing materials.
Phase 1: Demolition (3-5 days):
Demolition removes existing cabinets, countertops, appliances, flooring, and sometimes walls or ceiling materials. Good contractors protect adjacent rooms with plastic barriers, create safe egress paths, and rent dumpsters for debris removal. Demolition reveals hidden problems that may require scope adjustments.
Phase 2: Rough-in work (1-2 weeks):
Framing, electrical, plumbing, and HVAC rough-in happens once demolition exposes wall cavities. Contractors move outlets, install new circuits, reroute plumbing, add gas lines, and frame new walls or openings. Rough-in inspections occur before moving to next phases.
Phase 3: Drywall and flooring (1 week):
New or patched drywall gets hung, taped, and finished. Many contractors paint before installing cabinets to speed the process and avoid paint drips on new finishes. Flooring installation timing depends on your choice: install tile or hardwood before cabinets to avoid transitions and matching issues later, or install after cabinets to save on flooring cost covering areas under cabinets.
Phase 4: Cabinet installation (3-5 days):
Cabinet installation requires precision—everything must be level, plumb, and properly secured. Upper cabinets install first, followed by base cabinets. Quality installers take time to shim and adjust every cabinet perfectly before securing permanently.
Phase 5: Countertop templating and installation (1-2 weeks):
After cabinets are set, countertop fabricators create precise templates, typically requiring 5-10 days for fabrication before installation. Stone counters are heavy, fragile, and expensive—professional installation is essential.
Phase 6: Backsplash, fixtures, and appliances (3-5 days):
Backsplash tile installation follows countertops. Plumbers install sinks and faucets, electricians connect lights and outlets, and appliances get delivered and installed. The kitchen starts functioning again as each element completes.
Phase 7: Finishing touches (2-3 days):
Final paint touch-ups, hardware installation, baseboard and trim work, and final cleaning complete your project. Contractors conduct walkthroughs to identify and address any punch-list items before requesting final payment.
Total realistic timeline:
Minor updates (painting, new appliances, simple counter replacement): 2-4 weeks. Moderate remodels (new cabinets, counters, flooring, fixtures): 6-8 weeks. Major renovations (layout changes, moving plumbing, structural work): 8-12 weeks or more.
Always add 2-4 weeks buffer for unexpected delays. Material shortages, weather impacting deliveries, contractor scheduling, inspection delays, and hidden problems all extend timelines beyond initial estimates.
Living Through Your Kitchen Remodel
Surviving construction requires preparation, patience, and backup plans. This practical section of your kitchen remodeling guide helps you maintain sanity during the renovation chaos.
Setting up a temporary kitchen:
Before demolition, create a temporary kitchen in another room with a microwave, coffee maker, toaster, and mini refrigerator. Set up a dish-washing station with a plastic bin. Stock paper plates, cups, and utensils to minimize dish washing. Establish a small prep area with cutting board and essential utensils.
Store non-refrigerated foods, spices, and cooking tools in plastic bins for easy access. Keep frequently-used items separate from seasonal or rarely-used items that can stay packed away throughout construction.
Managing meals during construction:
Budget extra money for restaurant meals and takeout—you’ll eat out more than planned. Research meal kit delivery services, prepared meal companies, or grocery store ready-to-eat options. Utilize slow cookers, instant pots, or outdoor grills if you can access power in other locations. Consider asking friends or family if you can occasionally use their kitchens for meal prep sessions.
Protecting your home and belongings:
Clear all items from kitchen cabinets and drawers before contractors arrive. Cover furniture in adjacent rooms with plastic sheeting. Remove or cover artwork and decorations near construction zones. Close doors to bedrooms and other areas to contain dust. Run air purifiers to capture airborne particles. Expect dust everywhere despite barriers—wipe down surfaces daily in living areas.
Managing daily life around construction:
Establish clear work hours with your contractor—typically 7 AM to 5 PM on weekdays. Know when to be home (for critical decisions or deliveries) and when to leave (noisy demo work). Secure pets in safe areas away from open doors and construction hazards. Plan activities outside the home when possible to reduce stress and safety concerns.
Maintaining communication with contractors:
Establish a preferred communication method (text, phone, email) and stick to it. Schedule brief daily check-ins to address questions and review progress. Save major discussions for scheduled meetings rather than constant interruptions. Document decisions in writing to prevent misunderstandings. Take photos throughout construction for records and to track progress.
Conclusion
Your successful kitchen transformation starts with thorough planning and preparation. This kitchen remodeling guide has walked you through every critical decision: assessing your space, establishing realistic budgets with adequate contingency funds, designing functional layouts that improve workflow, selecting quality materials that balance beauty and durability, hiring skilled contractors, and managing the construction process from start to finish.
Remember these key takeaways as you move forward: invest time in planning before construction begins, set aside 20% of your budget for unexpected costs, prioritize contractor quality over the lowest bid, and maintain realistic timeline expectations with built-in buffers. Your dream kitchen awaits—now you have the knowledge to make it reality without the common mistakes that plague unprepared homeowners. Your next step is clear: start assessing your current space, defining your goals, and beginning conversations with qualified contractors in your area.
🏡 Explore More Home Improvement Guides
- Complete Flooring Guide: Every Type Explained for Your Home
- Complete Bathroom Renovation Guide: Style, Function & Budget Solutions
- Bathroom Renovation Masterclass: Your Complete Guide to a Successful Remodel
- Best Flooring for Every Room: Complete Guide with Expert Tips
- Kitchen Remodeling Guide: Everything You Need for a Successful Transformation
- Home Renovation Permits and Regulations: Complete Checklist
- Renovation Mistakes That Cost Thousands (And How to Avoid Them)
- Kitchen Layout Planning: Which Design Works for You?
- Best Kitchen Countertops: Comparing All Materials
- Smart Home Technology Integration Guide: Room-by-Room Blueprint
- Outdoor Living Spaces: Complete Design Guide for Year-Round Enjoyment
- Best Home Office Setup (2025 Guide): Accessories & Essentials for Productivity
- DIY vs Hiring Contractors: When to Call the Pros?
- Home Renovation Cost Breakdown: Budget Like a Pro
- How to Plan Your Home Renovation: Step-by-Step Timeline
- Complete Home Renovation Guide: Transform Your House Into Your Dream Home

